Have you had this happen? It’s that frustrating moment when Facebook isn’t displaying your image properly…or at all. 🙂 Sharing images on social media shouldn’t be this hard!
If you want your content to get noticed, you know that you need to include an image with your social media posts. Remember: posts with images produce 650% higher engagement than text-only posts.
So, we’ve determined the importance of using images in social media and social selling. What can you do to make sure that your image looks darn good when shared on social media?
Here’s how to optimize sharing images on social media. (It won’t necessarily be perfect every time, but one can try!)
Make Your Images Look Good When Sharing Them on Social Media
1) WordPress Featured Image
The “Featured Image” could be one of the most overlooked options in WordPress.
The Featured Image option appears on the lower right column on each Page and Post you create in WordPress.
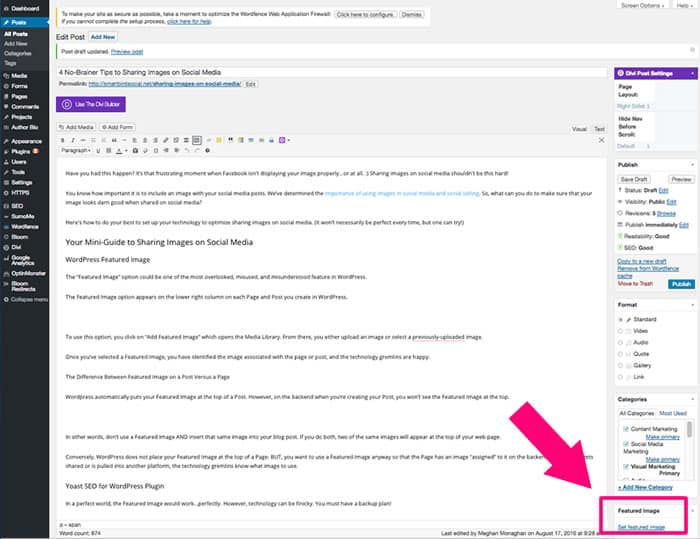
To use this option, you click on “Set Featured Image” which opens the Media Library. From there, you either upload an image or select a previously uploaded image.
Once you’ve selected a Featured Image, you have identified the image associated with the page or post, and the technology gremlins are happy. Now when you’re sharing this web page, the image *should* be identified.
The Difference Between Featured Image on a Post Versus a Page
WordPress automatically puts your Featured Image at the top of a Post on the front end of your site. However, on the backend when you’re creating your Post, you won’t see the Featured Image at the top.
In other words, don’t use a Featured Image AND insert that same image into your blog post. If you do both, two of the same images will appear at the top of your web page.<
Don’t use a Featured Image AND insert that same image into your blog post unless you want the image to appear twice at the top of your web page.
Conversely, WordPress does not place your Featured Image at the top of a Page. BUT, you want to use a Featured Image anyway so that the Page has an image “assigned” to it on the backend. If your Page gets shared or is pulled into another platform, the technology gremlins know what image to use.
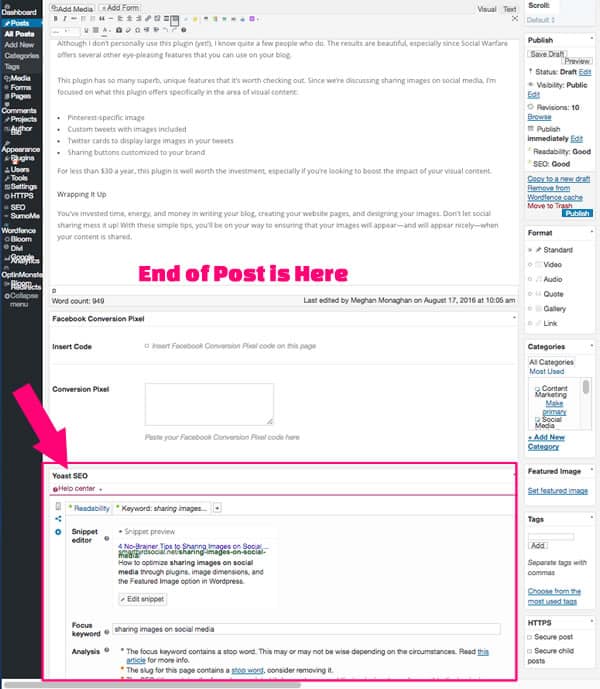
2) Yoast SEO for WordPress Plugin
In a perfect world, the Featured Image would always work for sharing images on social media. However, technology can be finicky. You must have a backup plan!
My go-to second option for sharing images on social media is the free version of SEO Plugin by Yoast.
The social sharing options in Yoast’s plugin are also often overlooked yet are a simple way to manage what image is associated with your Post or Page in WordPress.
After you’ve installed Yoast SEO, it will appear beneath every Post and Page on the backend view of your WordPress site.
Use the “sharing icon” to identify what image should be shared for each Post and Page. You can also edit the Title and Description if you want them to differ from your Post or Page’s existing attributes.
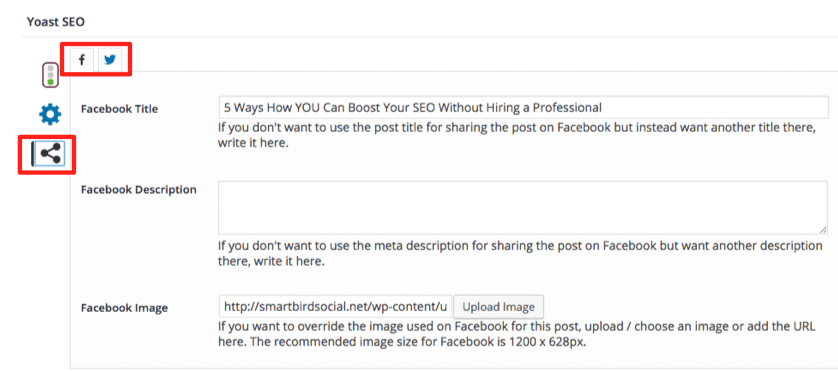
There are two tabs—Twitter and Facebook—so that you can choose what images get shared for each. As you probably know, the two platforms have different ideal image dimensions. Yoast SEO allows you to select different images for each platform. Sweet!
***I highly recommend using Yoast SEO’s features for optimizing each web page for search engines. Even if you don’t want to deal with SEO for now, at least consider using the plugin to identify what information gets shared on social media.***
Be sure to save your changes by clicking “Update” and you’re good to go.
3) Image Dimensions
You’d think by now sharing images on social media is done. Technically, you could stop here because you’ve done your due diligence to make sure that your images look awesome when shared.
However, image dimensions can make a difference. When creating the image that is to be shared, use a horizontal layout with the dimensions of 1024 x 512 pixels. Here’s a trick: keep the main part of the design near the center. Then you’re covered for both horizontal and square image sizes.
For example, I use a 1024 x 512 px sized Featured Image for my blog posts. This one image works across multiple social media platforms. Centering the important elements in a horizontal design means that if the left and right side of the image are cropped, the design would still look good. Check it out:
You might want to use a vertical design if you’re social media marketing strategy uses Pinterest or Google Plus. Buffer discusses this topic more in an article about image sizes in social media posts.
4) Social Warfare Plugin
To have more control of sharing images on social media, consider investing in the Social Warfare* WordPress plugin.
Social Warfare is a social sharing plugin, which means that it places buttons on your site so that people can easily share your content. (Disclosure: I’m an affiliate for Social Warfare.)
The results are beautiful, especially since Social Warfare offers several other eye-pleasing features that you can use on your blog.
This plugin has so many superb, unique features that it’s worth checking out. Since we’re discussing sharing images on social media, I’m focused on what this plugin offers specifically in the area of visual content:
- Pinterest-specific image
- Custom tweets with images included
- Twitter cards to display large images in your tweets
- Sharing buttons customized to your brand
- Content protection with a frame buster option
For less than $30 a year, this plugin is well worth the investment, especially if you’re looking to boost the impact of your visual content.
If you’re interested, I’ve revealed more about this plugin in my article Here’s Why Social Sharing Matters to Your Business.
One Final Tip That You Don’t Want to Miss – Refresh!
If you make any changes to your metadata and images AFTER hitting the publish button, don’t forget to REFRESH the cache on both Facebook and Twitter. This step ensures that your updates appear on these platforms.
Without this step, your old data could still show up when shared.
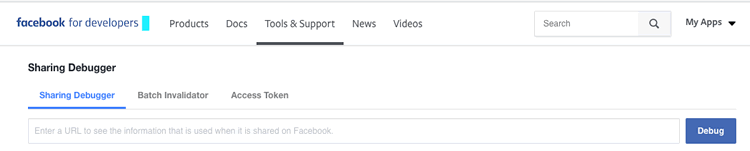
Facebook Cache Refresh
Go to the Sharing Debugger here, enter the page’s URL, and click “Debug.”
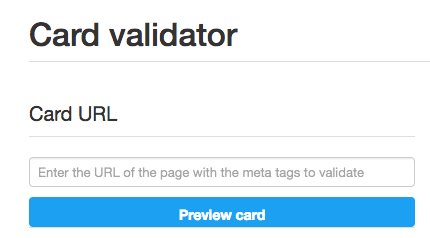
Twitter Cache Refresh
Performing a similar step for Twitter will also update your web page’s metadata and image information. Using Twitter’s Card Validator, enter your page’s URL and click “Preview Card.”
I’ve written more details about using Twitter cards for your website if you need help!
Wrapping It Up
You’ve invested time, energy, and money in writing your blog, creating your website pages, and designing your images. These simple tips will have you on your way to ensuring that your images will not only appear but also appear nicely when your content is shared.
Oh my gosh, I never noticed that sharing icon on the left side of the Yoast info at the bottom. I always use the stoplight section, but never even realized the social media sharing section was there! Thanks Meghan.
That’s terrific, Bob! Now you can use Yoast to manage how your content looks on Facebook and Twitter. Yoast is still a valuable free plugin, but I now use the Social Warfare plugin to manage how my content appears when it’s shared on social media. Thank you for commenting and letting me know I helped you out (you made my day!).